After 20 years of teaching at Brookfield Central, I am saying goodbye. Although I spent the majority of that time in the physics classroom alongside my learners. That changed for my last 18 weeks. I ended up in a place similar to where I started, teaching chemistry and biology. So, rather than dealing with juniors and seniors at the end of their high school careers, I was in classrooms with freshmen and sophomores still trying to find their place. At the same time, I was learning and teaching a set curriculum I hadn't taught in over a decade. So, we were learning. But, of course, I already knew the content. The point of this post is to take a step back, reflect, and share the gratitude from the last students I had in my 20 years at Brookfield Central High School, as expressed through the cards and notes they made for me on my last day with them. I don't take many "yay me" moments. But after 20 years, I'll soak this one in.
- Mastery of Unit Outcomes
- Mastery of State or National Standards
- Habits of Mind
- Learner Strengths or Growth Over Time
Create sites
In the video below, you can see how you can create a new Google Site right from Google Drive. Just like any other Google File, it’s important to name the file and set up viewing rights. For any collaborators, be sure to give them rights to the draft version.Design of Site
It seems like every couple of months, Google increases the ability to customize the look of your Google Sites. The main place to do this is in Themes. The video below goes over adding header images and customizing themes in terms of colors and fonts.Organization of Portfolio Pages
The first page you land on is the Home page for the site. I usually save the completion of this page for the end of the course. That way the student has complete knowledge of what the portfolio contains. So, let's leave that blank for now and move onto creation of other pages.The purpose of the portfolio will determine the set-up of pages.
- If the purpose is to highlight unit standards, each page would cover a different unit. Each page could house evidence of mastery for the standards of that unit.
- If the purpose is to provide evidence of larger overarching course standards each page would be for a different standard. Each page then could house multiple pieces of evidence for that standard or one piece for distinct components of the standard.
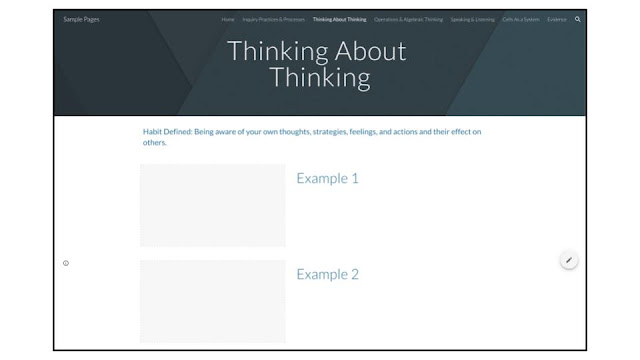
- Habits of mind and Learner strengths are a great way for students to start thinking about themselves beyond the simple content of a course. Have students choose a select number of Habits of Mind or Learners Strengths and assign each a page in the portfolio. Then, learners would define the habit or strength followed by providing pieces of evidence to support that strength or habit of mind. Click here to learn more about Habits of Mind from Bena Kallick and Arthur Costa. If you’re looking for examples of learner strengths, check out this list from Barbara Bray.

Adding Evidence to a Page
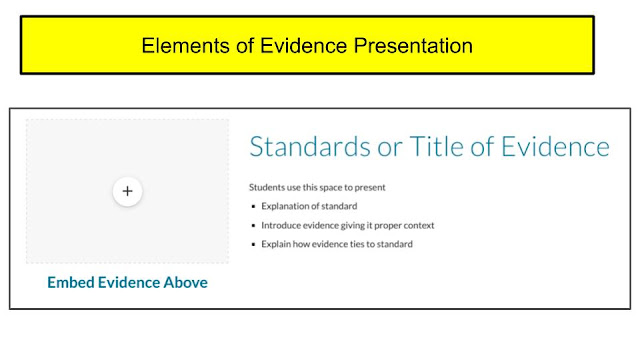
Once the teacher has decided the structure for the portfolio, it is up to the learners to determine which pieces of evidence are appropriate and present them in a meaningful manner providing context and rationale.
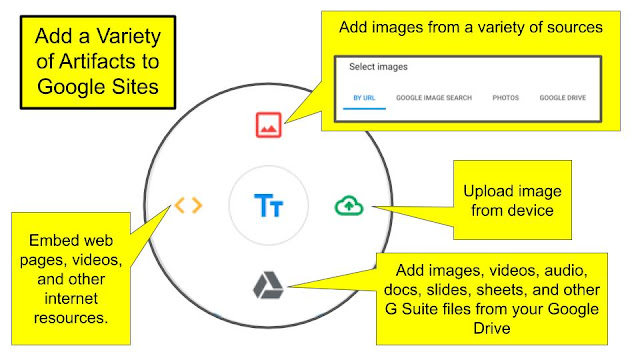
While there are many ways to add text and artifacts to a slide, the use of Layouts can go a long way to giving any portfolio page a consistent and professional look and feel.
For any piece of evidence, students should be sure to introduce the artifact so a general audience could understand it. Somewhere on the page, students should clearly communicate what the standards means. Most importantly, how this piece of evidence demonstrates mastery of the standard.

Publishing
When publishing, there are a variety of options including in domain and global levels of publishing. Alternatively, students can simply publish to individuals like teachers and parents.Other Pages
The Home page is an essential page for the author to introduce themselves and the contents of the portfolio. Students can use an image of themselves with a text introduction. Students can also add buttons with links to different pages in the portfolio. While images and text make a great introduction, consider using the power of video to allow learners to introduce themselves to their audience. I have had great success with students embedding Flipgrid videos. What’s great is that these videos include closed captioning to increase accessibility. |
| Click on image to access student portfolio site |
Beyond the academic, think about having students including information about themselves. I have my students create a passions page in which they add YouTube Videos or images that describe them in 4 different categories
If possible, it would be amazing if a team of educators came together and coordinated having students use the same portfolio to showcase work across multiple classes. But, I would recommend starting with just getting students going in one course. But once students have the basics, you’ll be amazed at how easy it is for them to get in, create and share.
While this post is focused on using Google Sites to create a portfolio, there are lots of other amazing tools for this. Even Google Slides could be used for this. Slides has the ability to insert a wide variety of media as well. Teachers can easily create and share a template for students to follow in which students can simply choose, add, and explain the artifact without worrying about the additional steps that sites brings. I look forward to seeing what your learners create!
- Hopes & Aspirations
- Favorites in Media
- Hobbies
- What they like to create
 |
| Click on image to access student portfolio site |
If possible, it would be amazing if a team of educators came together and coordinated having students use the same portfolio to showcase work across multiple classes. But, I would recommend starting with just getting students going in one course. But once students have the basics, you’ll be amazed at how easy it is for them to get in, create and share.
While this post is focused on using Google Sites to create a portfolio, there are lots of other amazing tools for this. Even Google Slides could be used for this. Slides has the ability to insert a wide variety of media as well. Teachers can easily create and share a template for students to follow in which students can simply choose, add, and explain the artifact without worrying about the additional steps that sites brings. I look forward to seeing what your learners create!


Comments
Post a Comment